
Master Rose Propagation: How To Grow More Roses From Simple Cuttings – imagine transforming a simple rose cutting into a vibrant, fragrant rose bush. It’s a rewarding experience that opens up a world of possibilities for rose enthusiasts. This comprehensive guide provides a step-by-step journey into the art of rose propagation, revealing the secrets to successfully growing more roses from cuttings.
From understanding the different types of rose cuttings and choosing the right stems to mastering the art of rooting and caring for your new plants, this guide covers all the essential techniques. We’ll delve into the intricacies of preparing cuttings, exploring various rooting methods, and providing valuable tips on transplanting and nurturing your young rose bushes.
We’ll also address common problems encountered during propagation, offering solutions and preventive measures to ensure success.
Introduction to Rose Propagation
Rose propagation through cuttings is a rewarding and efficient method for expanding your rose garden or starting a new collection. This technique allows you to create genetically identical copies of your favorite roses, ensuring that you maintain the unique characteristics of the original plant.
Types of Rose Cuttings
The success of rose propagation depends on the type of cutting used. Rose cuttings are generally categorized into three types: softwood, hardwood, and semi-hardwood.
- Softwood Cuttings: These cuttings are taken from the current season’s new growth, typically in the spring or early summer. Softwood cuttings are soft and flexible, making them easier to root. They are best for propagating roses that have a vigorous growth habit.
- Hardwood Cuttings: These cuttings are taken from mature, dormant wood in the winter. Hardwood cuttings are thicker and more rigid than softwood cuttings, making them more challenging to root. They are often used for propagating roses that are difficult to root from softwood cuttings.
- Semi-hardwood Cuttings: These cuttings are taken from partially mature wood in the late summer or early fall. Semi-hardwood cuttings are a good compromise between softwood and hardwood cuttings, offering a balance of flexibility and maturity. They are suitable for a wide range of rose varieties.
Best Time of Year to Take Rose Cuttings
The optimal time to take rose cuttings depends on the type of cutting you are using.
- Softwood Cuttings: The best time to take softwood cuttings is in the spring or early summer, when the new growth is actively growing.
- Hardwood Cuttings: The best time to take hardwood cuttings is in the winter, when the rose bushes are dormant.
- Semi-hardwood Cuttings: The best time to take semi-hardwood cuttings is in the late summer or early fall, when the wood has partially matured.
Choosing the Right Cuttings

Successful rose propagation relies heavily on selecting the right cuttings. Choosing healthy, vigorous stems will significantly increase your chances of success.
Characteristics of a Healthy Rose Stem
Choosing a healthy stem is crucial for successful rose propagation. Healthy stems have a vibrant, green color and are firm to the touch. Avoid stems that are:
- Discolored: Look for stems with a healthy green color. Avoid stems that are brown, yellow, or have any signs of disease.
- Wilted or Drooping: A healthy stem should be firm and upright. Avoid stems that are wilted, limp, or drooping.
- Damaged or Broken: Cuttings should be free of any damage or broken sections. These areas can make it difficult for the cutting to root.
- Infected with Pests or Diseases: Inspect stems for any signs of insects, fungal growth, or other diseases. Avoid stems that show signs of infection.
Ideal Length and Thickness of a Rose Cutting
The length and thickness of a cutting are important factors to consider.
- Length: Aim for a cutting length of 4-6 inches. This provides enough space for the development of roots and leaves. A cutting that is too short might not have enough energy reserves to root, while a cutting that is too long might be more susceptible to wilting.
Mastering rose propagation through cuttings is a rewarding endeavor, offering the chance to expand your rose garden with ease. Just like roses, Schefflera plants can also be propagated from cuttings, a process that’s surprisingly straightforward. If you’re interested in learning more about this technique, check out The Complete Guide to Growing New Schefflera Plants from Cuttings , which provides detailed instructions and tips.
With a little patience and the right approach, you can successfully propagate both roses and Schefflera plants, adding vibrant blooms and lush foliage to your home and garden.
- Thickness: Choose a cutting that is about the thickness of a pencil. Thicker stems have more energy reserves and are more likely to root successfully.
Selecting a Cutting from a Healthy, Disease-Free Rose Bush, Master Rose Propagation: How To Grow More Roses From Simple Cuttings
It’s essential to select cuttings from a healthy, disease-free rose bush. This will help ensure that your new rose plants are also healthy and vigorous.
- Disease-Free: Inspect the rose bush for any signs of disease, such as black spot, powdery mildew, or rust. Choose cuttings from a bush that appears healthy and vigorous.
- Vigorous Growth: Select cuttings from a rose bush that is actively growing and producing new stems. This indicates that the bush is healthy and has the energy reserves to support new growth.
Preparing the Cuttings
Once you have selected your healthy rose cuttings, it’s time to prepare them for propagation. This involves making clean cuts, removing excess foliage, and treating the cut ends with rooting hormone.
Making Clean Cuts
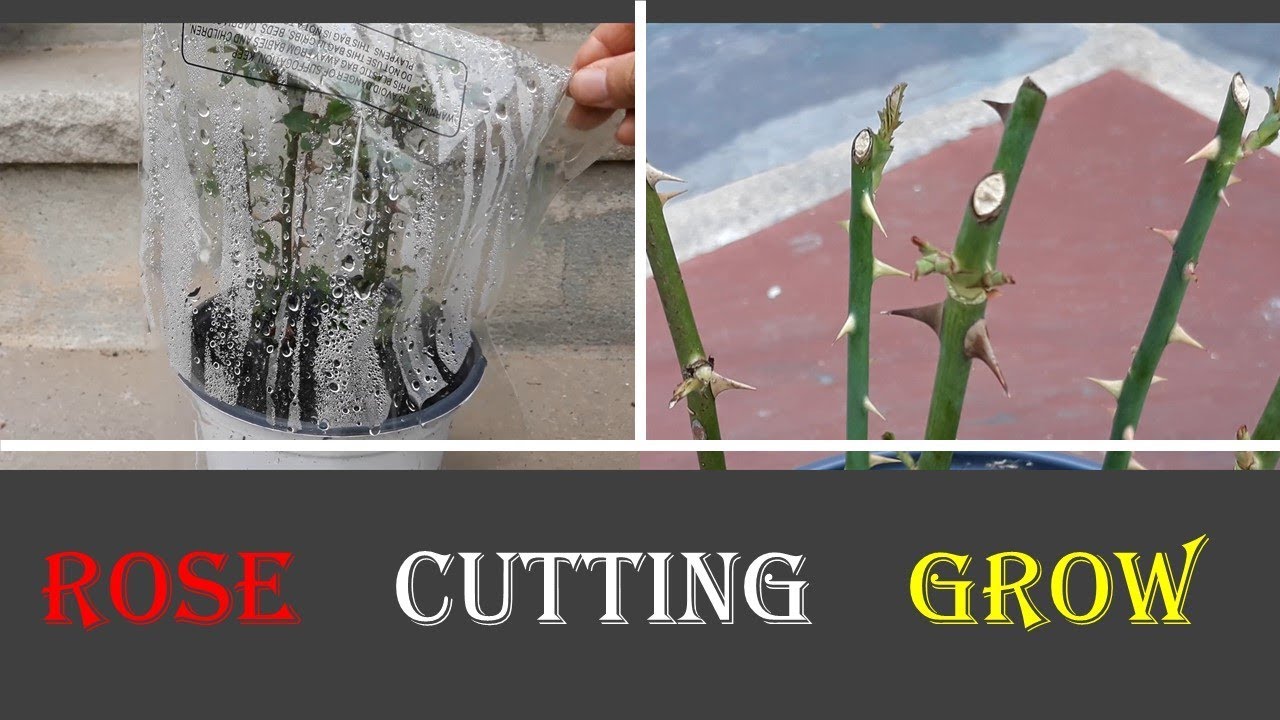
A clean cut at the base of the cutting is crucial for successful root development. A sharp knife or pruning shears should be used to make a precise, angled cut just below a node. The angled cut helps to increase the surface area for root growth.
Removing Leaves and Thorns
The lower portion of the cutting should be stripped of leaves and thorns. This helps to prevent the cutting from rotting and allows the energy of the cutting to focus on root development. Remove all leaves below the first set of leaves, leaving two to three leaves on the top of the cutting.
Thorns can also be removed to prevent injury during handling.
Treating the Cut End with Rooting Hormone
Treating the cut end of the cutting with rooting hormone can significantly increase the chances of successful rooting. Rooting hormone contains plant growth regulators that stimulate root development.
To apply rooting hormone, dip the cut end of the cutting in a powder or liquid formulation of rooting hormone. Make sure the entire cut end is coated with the hormone.
Rooting Methods
Rose cuttings can be rooted using various methods, each with its advantages and disadvantages. Understanding the nuances of these methods helps you choose the most suitable option for your specific needs and environment.
Water Rooting
Water rooting is a simple and straightforward method that allows you to observe root development.
- Cuttings are placed in a clear container filled with water, ensuring the nodes (where roots emerge) are submerged.
- The water should be changed regularly to prevent bacterial growth and ensure the cuttings receive fresh oxygen.
- Once roots develop, typically within a few weeks, the cuttings can be transplanted into soil.
Soil Rooting
Soil rooting is a more traditional method, providing a stable environment for root development.
- A well-draining potting mix is essential for preventing root rot.
- The cuttings are inserted into the prepared soil, ensuring the nodes are buried below the soil surface.
- The soil should be kept consistently moist, but not waterlogged.
Rooting Hormone
Rooting hormone, a synthetic compound, helps stimulate root growth and improves the success rate of propagation.
- The hormone is typically applied to the cut end of the stem, promoting faster root formation.
- Rooting hormone is available in powder, liquid, or gel form.
- The choice of rooting hormone depends on the type of rose and the specific method of propagation.
Preparing a Rooting Medium
The success of rooting rose cuttings depends on the quality of the rooting medium. It should be well-draining to prevent root rot, yet retain moisture to support root growth.
- A mixture of peat moss, perlite, and vermiculite is commonly used for rooting rose cuttings.
- Peat moss provides moisture retention, while perlite and vermiculite improve drainage and aeration.
- The mixture should be sterilized to eliminate pathogens and create a healthy environment for root development.
Comparison of Rooting Methods
Rooting Method |
Pros |
Cons |
|---|---|---|
Water Rooting |
Simple, inexpensive, allows for root observation. |
Susceptible to bacterial growth, may not be suitable for all rose varieties. |
Soil Rooting |
Provides a stable environment for root development, suitable for most rose varieties. |
Requires more effort and monitoring, risk of root rot if soil is not well-draining. |
Rooting Hormone |
Increases success rate of propagation, promotes faster root formation. |
May be expensive, can be harmful if not used properly. |
Caring for Rooted Cuttings
Once your rose cuttings have successfully developed roots, they are ready to be transplanted into individual pots or directly into the garden. This crucial stage requires careful attention to ensure their continued growth and survival. Providing optimal conditions for humidity, temperature, and watering is essential for their healthy establishment.
Humidity and Temperature
Maintaining high humidity levels is crucial for newly rooted cuttings. The ideal humidity range is between 60% and 80%. This helps to prevent the cuttings from drying out and encourages healthy root development. You can achieve this by covering the pots with a clear plastic dome or bag.
Creating a warm environment is also important for the cuttings. An ideal temperature range for most rose varieties is between 70°F and 80°F (21°C and 27°C). You can achieve this by placing the pots in a warm location, such as a greenhouse or a sunny windowsill.
Watering and Drainage
Watering is essential for the growth and development of the rooted cuttings. It is crucial to maintain a consistently moist soil environment without overwatering. Overwatering can lead to root rot, while underwatering can cause the cuttings to wilt and die.
- Watering frequency:Water the cuttings when the top inch of soil feels dry to the touch.
- Watering method:Water the cuttings thoroughly, ensuring the water reaches the roots. Avoid watering from above, as this can dislodge the cuttings.
- Drainage:Ensure that the pots have adequate drainage holes to prevent waterlogging.
Signs of a Healthy Rooted Cutting
Identifying the signs of a healthy rooted cutting is crucial for determining their successful establishment.
- New growth:The appearance of new leaves and stems indicates healthy root development.
- Firm stems:Healthy cuttings have firm stems that are not wilting or drooping.
- Healthy leaves:The leaves should be green, vibrant, and free from any signs of disease or pests.
- Strong root system:If you gently pull on the cutting, it should offer resistance, indicating a well-developed root system.
Transplanting and Growing New Roses
Once your rose cuttings have developed a strong root system, it’s time to transplant them into a larger pot or directly into your garden bed. This process allows the roses to flourish and grow into beautiful, healthy bushes.
Transplanting Rooted Cuttings
Transplanting rooted cuttings requires careful handling to minimize stress and promote healthy growth. Here’s how to do it:
- Choose the right time:The best time to transplant roses is in spring or early fall when the weather is mild and the soil is moist. Avoid transplanting during extreme heat or cold.
- Prepare the new container or garden bed:Ensure the new pot is large enough to accommodate the rose’s roots, with drainage holes to prevent waterlogging. For garden beds, amend the soil with compost or other organic matter to improve drainage and fertility.
- Gently remove the cutting from its rooting container:Carefully loosen the cutting from its container by tapping the sides and gently pulling the stem. Avoid damaging the roots.
- Place the cutting in the new container or garden bed:Position the cutting at the same depth it was growing in the rooting container. Fill the container or bed with soil, ensuring the roots are well-covered and the soil is firm.
- Water thoroughly:Water the newly transplanted rose deeply to settle the soil and promote root growth.
Caring for Newly Transplanted Roses
Newly transplanted roses require extra attention to help them establish themselves in their new environment.
- Water regularly:Water the roses deeply and consistently, especially during the first few weeks after transplanting. Ensure the soil remains moist but not waterlogged.
- Fertilize:Use a balanced fertilizer specifically designed for roses. Apply fertilizer according to the product instructions, usually every 4-6 weeks during the growing season.
- Mulch:Apply a layer of organic mulch around the base of the rose bush to conserve moisture, suppress weeds, and regulate soil temperature.
- Prune:Pinch off any flower buds that appear during the first year after transplanting. This encourages the rose bush to focus its energy on root development and overall growth.
- Protect from pests and diseases:Regularly inspect the rose bushes for signs of pests or diseases and take appropriate measures to control them.
Encouraging Healthy Growth and Flowering
To ensure your new rose bushes thrive and produce abundant blooms, follow these tips:
- Provide adequate sunlight:Roses need at least 6 hours of direct sunlight daily. Choose a location in your garden that receives ample sunlight.
- Maintain proper soil pH:Roses prefer a slightly acidic soil pH between 6.0 and 6.5. Test your soil and adjust the pH accordingly.
- Prune regularly:Prune your roses in late winter or early spring to remove dead, diseased, or crossing branches. This encourages healthy growth and abundant flowering.
- Deadhead spent blooms:Remove faded flowers to encourage the rose bush to produce more blooms.
Troubleshooting Common Problems
Rose propagation, while rewarding, can sometimes be met with challenges. Understanding common problems and their solutions is crucial for successful propagation. This section will guide you through identifying and addressing potential issues that may arise during the process.
Common Problems and Solutions
It’s important to be aware of common problems that can occur during rose propagation, such as rot, pests, and diseases. Knowing the causes and solutions will help you take preventive measures and address issues effectively.
Problem |
Causes |
Solutions |
|---|---|---|
Rot |
|
|
Pests |
|
|
Diseases |
|
|
Advanced Rose Propagation Techniques

Rose propagation can be further explored with advanced techniques that offer unique advantages for specific situations. These methods involve grafting, seed propagation, and root cuttings, allowing for the creation of new rose varieties or the multiplication of desired traits.
Grafting Roses
Grafting is a technique where a scion, or a cutting from a desired rose variety, is joined to a rootstock, or the root system of another rose. This method allows for the propagation of specific rose varieties that may be difficult to root from cuttings or have desirable characteristics like disease resistance or cold hardiness.
The scion’s growth is then supported by the rootstock, ensuring a successful union.Grafting is a more complex technique than other propagation methods and requires specific tools and knowledge. There are various grafting methods, including:
- Whip and Tongue Grafting:This method involves making a slanted cut on both the scion and the rootstock, creating a tongue-like projection on each. The tongue and whip are then fitted together and secured with tape or grafting wax. This method is commonly used for roses with similar stem diameters.
- Cleft Grafting:This method involves making a vertical split in the rootstock and inserting a wedge-shaped scion. The scion is then secured with grafting wax. This method is often used for larger rootstocks and scions.
- Bud Grafting:This method involves removing a bud from a desired rose variety and inserting it under the bark of a rootstock. The bud is then secured with grafting tape or wax. This method is commonly used for roses with different stem diameters.
The success of grafting depends on several factors, including the compatibility of the scion and rootstock, the timing of the graft, and the proper care of the grafted plant.
Propagating Roses From Seeds
Propagating roses from seeds is a less common method, but it can be used to create new rose varieties or to obtain roses that are not commercially available. This method involves collecting ripe rose hips from the rose plant and extracting the seeds.
The seeds are then sown in a seed starting tray filled with a well-draining seed starting mix. The tray should be kept in a warm and sunny location, and the seeds should be watered regularly. Germination can take several weeks or even months.
- Seed Collection:Rose hips, the fleshy fruits containing the seeds, are typically harvested in late fall or early winter after they have turned red or orange.
- Seed Extraction:The rose hips are then cleaned, and the seeds are extracted by removing the fleshy pulp.
- Seed Scarification:Rose seeds have a hard outer coat that prevents water and oxygen from reaching the embryo. To promote germination, the seeds can be scarified, which involves nicking the seed coat with a sharp knife or sandpaper.
- Sowing:The scarified seeds are then sown in a seed starting tray filled with a well-draining seed starting mix.
- Germination:Rose seeds can take several weeks or even months to germinate. They require warm temperatures (around 70-75 degrees Fahrenheit) and consistent moisture.
Rose seedlings grown from seeds may not always produce flowers identical to the parent plant. However, this method offers the possibility of creating new and unique rose varieties.
Mastering rose propagation through cuttings is a rewarding experience, allowing you to expand your rose garden with ease. The process shares similarities with other climbing vines, like clematis, which can be successfully propagated using similar techniques. For a comprehensive guide on clematis propagation, check out this helpful article: How to Make Clematis Propagation Easy and Effective.
Once you’ve mastered the basics of rose propagation, you’ll be well on your way to creating a stunning rose garden filled with beautiful blooms.
Propagating Roses From Root Cuttings
Root cuttings are a less common but effective method of propagating roses. This method involves taking cuttings from the roots of a mature rose plant and rooting them in a suitable medium. This method is particularly useful for propagating roses that are difficult to root from stem cuttings or for creating new varieties with desirable root characteristics.
- Root Cutting Selection:Healthy, vigorous roots are selected from a mature rose plant.
- Root Cutting Preparation:The roots are cut into sections, each about 2-3 inches long. The cut ends are dusted with a rooting hormone to promote root development.
- Root Cutting Rooting:The root cuttings are then placed in a rooting medium, such as a mixture of perlite and vermiculite, and kept in a warm and humid environment.
- Root Cutting Care:The rooting medium is kept moist, and the cuttings are monitored for signs of root development.
Root cuttings typically take several weeks to develop roots. Once roots have formed, the new plants can be transplanted into individual pots or into the garden.
Final Review
Rose propagation through cuttings is a rewarding journey that unlocks the potential to cultivate a garden filled with vibrant roses. By following the techniques Artikeld in this guide, you can confidently embark on this exciting adventure, transforming simple cuttings into thriving rose bushes.
With patience, care, and the right knowledge, you’ll be amazed by the beauty and fragrance of your own propagated roses.
User Queries: Master Rose Propagation: How To Grow More Roses From Simple Cuttings
What are the best rose varieties for propagation?
Many rose varieties propagate well from cuttings. Consider roses known for their vigor, disease resistance, and ease of rooting. Popular choices include hybrid tea roses, floribunda roses, and shrub roses.
Can I use rooting hormone on all types of rose cuttings?
While rooting hormone can be beneficial for all types of rose cuttings, it’s particularly helpful for hardwood and semi-hardwood cuttings. Softwood cuttings may root well without it.
What are the signs of a healthy rooted rose cutting?
A healthy rooted rose cutting will show signs of new growth, including fresh leaves and stems. The roots should be firm and white, indicating that the cutting has successfully established itself in the rooting medium.
