
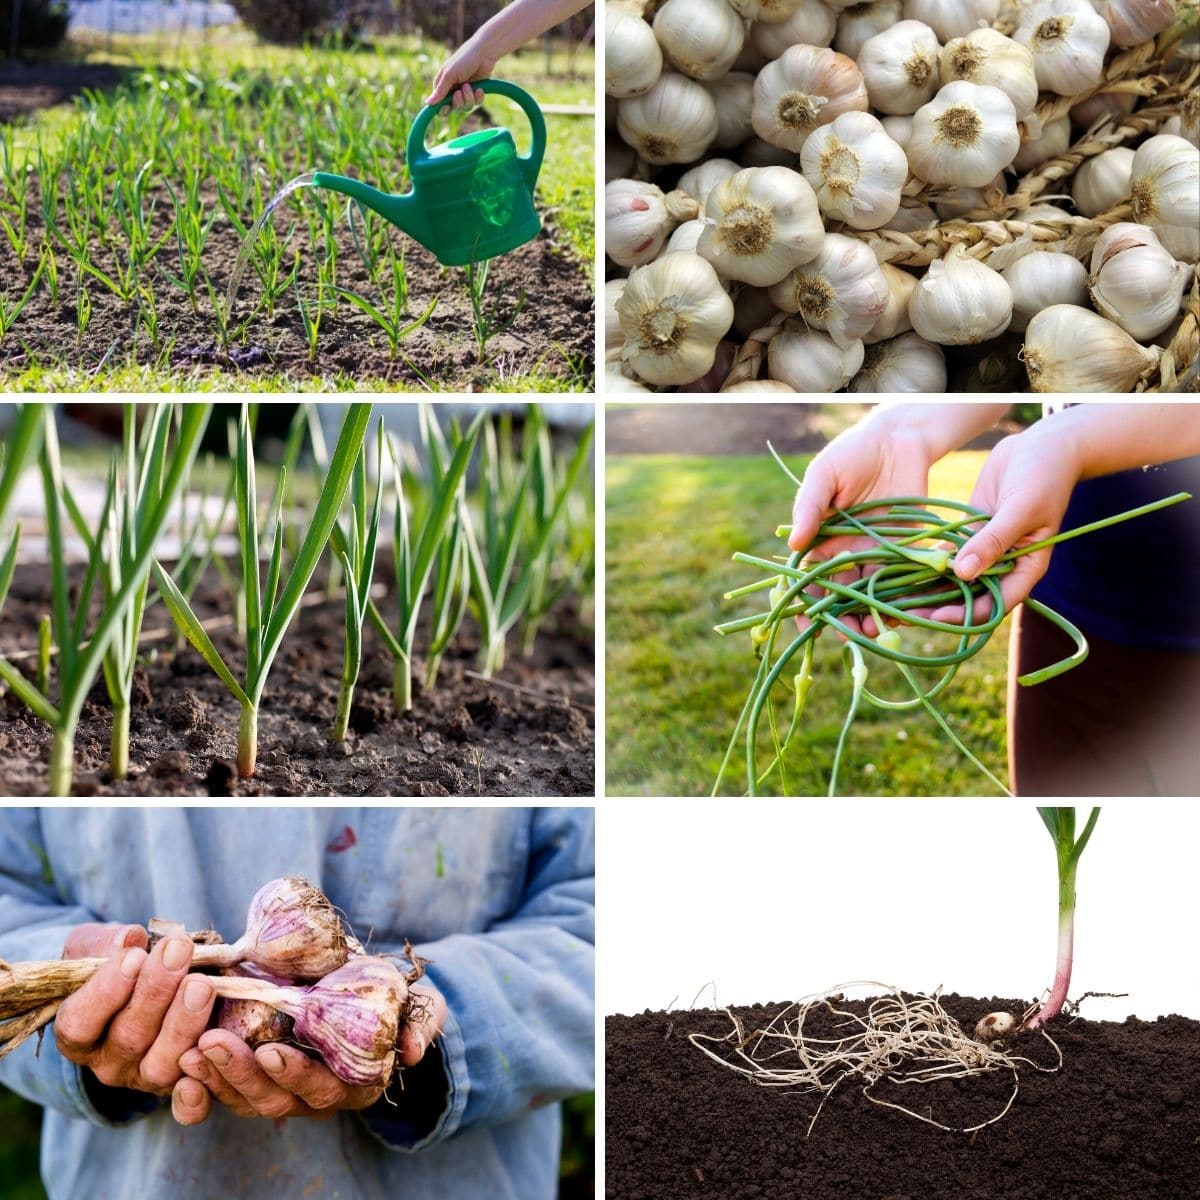
How To Propagate Garlic: Essential Tips for Thriving Bulbs – garlic, a staple in kitchens worldwide, is not only a culinary delight but also a surprisingly easy plant to propagate. Whether you’re a seasoned gardener or a novice green thumb, mastering the art of garlic propagation can provide you with a bountiful harvest of flavorful bulbs.
This guide will equip you with the essential knowledge and techniques to cultivate your own garlic patch, ensuring a thriving crop of these aromatic treasures.
From choosing the right garlic variety to understanding the optimal planting conditions, we’ll cover all the crucial steps involved in successfully propagating garlic. Discover the secrets of preparing garlic cloves for planting, the importance of proper spacing and depth, and the best practices for caring for your garlic plants throughout their growth cycle.
We’ll also delve into common challenges faced by garlic growers and provide practical solutions to ensure a healthy and productive harvest. Get ready to embark on a journey of garlic cultivation, where you’ll learn how to cultivate your own delicious garlic bulbs.
Introduction to Garlic Propagation
Garlic propagation is a rewarding process that allows you to enjoy the flavorful benefits of this versatile bulb year after year. Unlike many other vegetables, garlic does not produce seeds, so propagation relies on vegetative methods, which involve using parts of the existing plant to create new ones.
This method ensures that the new garlic plants retain the same genetic characteristics as the parent plant, preserving the unique flavor and growth habits.
Methods of Garlic Propagation
Garlic propagation can be achieved through two primary methods:
- Cloves:The most common method involves planting individual cloves from a garlic bulb. Each clove has the potential to develop into a new plant, making it a simple and efficient way to propagate garlic. This method is suitable for both hardneck and softneck garlic varieties.
- Bulbils:Hardneck garlic varieties produce bulbils, small, air-borne bulbs that grow at the top of the flower stalk. These bulbils can be planted and grown into new garlic plants, although they typically take longer to mature than cloves.
Essential Tools and Materials
To successfully propagate garlic, you will need a few basic tools and materials:
- Garlic Bulbs:Select healthy, disease-free garlic bulbs from a reputable source. For clove propagation, ensure that the cloves are firm and plump, while for bulbil propagation, choose mature bulbils from the flower stalks.
- Gardening Gloves:Protect your hands from the pungent garlic odor and potential soil contamination.
- Sharp Knife:Use a sharp knife to separate the cloves from the bulb, ensuring a clean cut.
- Garden Trowel:A garden trowel is essential for digging planting holes and gently placing the cloves or bulbils in the soil.
- Watering Can:Keep the soil consistently moist after planting to promote root development and growth.
Choosing the Right Garlic for Propagation
Not all garlic is created equal when it comes to propagation. Some varieties are better suited for planting and producing new bulbs than others. Selecting the right garlic for propagation is crucial for successful results.
Garlic Types Suitable for Propagation
Garlic varieties fall into two main categories: hardneck and softneck. Hardneck garlic is known for its strong flavor, while softneck garlic is milder and typically stores better. Both types can be propagated, but hardneck garlic is generally preferred for its ability to produce larger cloves and multiple bulbils (small garlic cloves that grow at the top of the flower stalk).
- Hardneck Garlic:Hardneck garlic varieties, such as Purple Stripe, Music, and Chesnok Red, are known for their distinctive scapes (flower stalks) and the production of bulbils. These varieties are generally considered to be more flavorful and better suited for propagation.
- Softneck Garlic:Softneck garlic varieties, such as Italian Early, Silverskin, and Inchelium Red, are typically milder in flavor and have a longer storage life. While they can be propagated, they may produce fewer bulbils and have a lower success rate compared to hardneck varieties.
Selecting Healthy Garlic Bulbs for Planting
Choosing healthy garlic bulbs is essential for successful propagation. Inspect the bulbs carefully for any signs of damage, disease, or pests.
- Look for Firm Bulbs:Healthy garlic bulbs are firm to the touch and have no soft spots. Avoid bulbs that are shriveled or have any signs of decay.
- Check for Disease or Pests:Examine the bulbs for any signs of disease, such as discoloration, mold, or rot. Also, look for evidence of pests, such as insect holes or larvae.
- Choose Large Bulbs:Larger garlic bulbs tend to produce more cloves and have a higher chance of success in propagation.
Characteristics of High-Quality Garlic for Propagation
High-quality garlic for propagation should meet certain criteria:
- Free of Disease and Pests:The bulbs should be free from any signs of disease, such as rot, mold, or discoloration. They should also be free of pests, such as insect holes or larvae.
- Firm and Well-Developed:The bulbs should be firm to the touch and have a well-developed structure. They should not be shriveled or have any soft spots.
- Large Cloves:Larger cloves are more likely to produce healthy and vigorous plants. Look for bulbs with large, plump cloves.
- Proper Storage:Garlic bulbs should be stored in a cool, dry, and well-ventilated area. This helps to prevent spoilage and maintain the quality of the bulbs.
Preparing the Garlic Bulbs for Propagation

Preparing the garlic bulbs for propagation is crucial to ensure successful growth and yield. This involves separating the cloves from the bulb and treating them with fungicides or other protective measures.
Separating Cloves from the Garlic Bulb
When choosing garlic bulbs for propagation, select healthy, disease-free bulbs with large, plump cloves.
- Gently break apart the garlic bulb, separating the cloves. Ensure that each clove remains intact and free from damage.
- Remove any loose papery skin or roots attached to the cloves.
Preparing the Cloves for Planting
Before planting, it’s essential to prepare the cloves to promote healthy growth.
- Allow the cloves to dry in a cool, well-ventilated area for several days. This allows the cloves to harden and develop a protective layer.
- Treat the cloves with a fungicide to prevent fungal diseases.
- Consider soaking the cloves in a solution of water and a rooting hormone. This can help to stimulate root development and improve the success rate of propagation.
Treating the Cloves with Fungicides or Other Protective Measures
Treating the cloves with fungicides or other protective measures is vital to protect them from fungal diseases.
- Fungicides can help prevent diseases like white rot and pink root.
- Choose a fungicide specifically designed for garlic and follow the manufacturer’s instructions for application.
- Alternatively, consider using natural methods like dipping the cloves in a solution of baking soda or using compost tea to reduce the risk of fungal infections.
Planting Garlic Cloves
Planting garlic cloves is a crucial step in the propagation process, ensuring the development of healthy and robust garlic bulbs. The timing of planting, soil selection, and proper spacing are key factors that influence the success of your garlic garden.
Optimal Planting Time for Garlic Cloves
The ideal time to plant garlic cloves varies depending on your region’s climate. Generally, garlic is planted in the fall for a spring harvest or in the spring for a fall harvest.
- Fall planting:This is the preferred method in most regions, as it allows the garlic to establish a strong root system before winter. In regions with mild winters, planting in late fall or early winter is recommended.
- Spring planting:In regions with harsh winters, planting in early spring is preferred. However, spring-planted garlic may not reach its full potential in terms of bulb size.
Choosing the Right Soil for Garlic Propagation
Garlic thrives in well-drained, fertile soil with a slightly acidic to neutral pH (6.0 to 7.0).
- Soil texture:Loamy soil, which is a mixture of sand, silt, and clay, provides good drainage and aeration, ideal for garlic growth.
- Soil amendments:Adding organic matter, such as compost or manure, improves soil fertility and drainage.
- pH level:Testing your soil pH is essential to determine if amendments are needed to achieve the optimal range. Lime can be added to raise the pH, while sulfur can be used to lower it.
Planting Depth and Spacing for Garlic Cloves
The proper planting depth and spacing are essential for healthy garlic growth.
Growing your own garlic is a rewarding experience, and propagating it is a simple way to expand your garden. Just like enjoying the sweet bounty of a local orchard, like Harvest Moon Orchard: Enjoy Every Moment This Year , planting garlic is a labor of love that yields delicious results.
By understanding the basics of propagation, you can ensure your garlic thrives, producing plump, flavorful bulbs for years to come.
- Planting depth:Garlic cloves should be planted 2 to 3 inches deep, with the pointed end facing upwards.
- Spacing:Garlic cloves should be spaced 6 to 8 inches apart in rows that are 12 to 18 inches apart. This spacing allows for adequate air circulation and prevents overcrowding.
Caring for Garlic Plants

Once your garlic cloves are planted, providing proper care is essential for their growth and development. This includes watering, fertilizing, and managing weeds and pests. By following these practices, you can nurture your garlic plants and ensure a bountiful harvest.
Watering Garlic Plants, How To Propagate Garlic: Essential Tips for Thriving Bulbs
Adequate watering is crucial for garlic growth. Garlic plants need consistent moisture, especially during the early stages of growth. However, overwatering can lead to root rot, so it’s important to find a balance. Here’s a general guideline for watering garlic plants:
- Water deeply and infrequently: Instead of frequent, shallow watering, aim for deep watering less often. This encourages deep root development, which is essential for drought tolerance.
- Monitor soil moisture: Check the soil moisture regularly by inserting your finger about 2 inches into the ground. If the soil feels dry, it’s time to water.
- Water in the morning: Watering in the morning allows the soil to dry out during the day, reducing the risk of fungal diseases.
- Avoid overhead watering: Overhead watering can promote fungal diseases. Water directly at the base of the plants.
Fertilizing Garlic Plants
Garlic plants benefit from a balanced fertilizer, particularly during the early stages of growth.
Propagating garlic is a rewarding endeavor for any gardener, much like the art of cultivating Bonsai trees. Both practices require patience, attention to detail, and a deep understanding of the plant’s needs. Just as a Bonsai artist carefully shapes and prunes their tree, a garlic gardener must select the right cloves, plant them at the optimal depth, and provide consistent care for healthy bulb development.
- Apply fertilizer before planting: Incorporate a balanced fertilizer, such as 10-10-10, into the soil before planting garlic cloves. This provides essential nutrients for initial growth.
- Side-dress with fertilizer: When the plants are about 6 inches tall, apply a second dose of fertilizer by side-dressing. This means applying fertilizer around the base of the plants, but not directly on the stems.
- Use organic fertilizers: Organic fertilizers, such as compost or manure, are beneficial for garlic plants. They release nutrients slowly and improve soil structure.
Controlling Weeds and Pests
Weeds and pests can compete with garlic plants for nutrients and water, affecting their growth and yield. It’s important to control these factors.
- Regular weeding: Regularly remove weeds from the garlic bed to prevent them from competing with your plants for resources.
- Mulch: Applying a layer of mulch, such as straw or wood chips, around the garlic plants can suppress weed growth and help retain moisture.
- Monitor for pests: Regularly inspect your garlic plants for signs of pests, such as aphids, slugs, or garlic mites.
- Use organic pest control methods: If pests are present, consider using organic pest control methods, such as insecticidal soap or neem oil.
Harvesting Garlic Bulbs: How To Propagate Garlic: Essential Tips For Thriving Bulbs
Garlic bulbs are ready for harvest when the plant’s leaves start to turn yellow and brown, and the scapes (flower stalks) have dried up. This usually happens about 100-120 days after planting, depending on the variety and climate.Harvesting garlic at the right time is crucial for maximizing bulb size and ensuring good storage quality.
Here’s how to properly harvest garlic bulbs:
Harvesting Garlic Bulbs
- Identify the signs of readiness:Look for the following signs that indicate the garlic is ready for harvest:
- The leaves start to turn yellow and brown.
- The scapes (flower stalks) have dried up.
- The garlic bulbs feel firm and heavy when you gently squeeze them.
- Dig up the garlic bulbs:Use a garden fork or shovel to carefully dig up the bulbs. Be sure to loosen the soil around the base of the plant before lifting it out of the ground.
- Avoid using a sharp tool that might damage the bulbs.
- Dig up the bulbs on a dry day to minimize soil clinging to the bulbs.
- Shake off excess soil:Gently shake off any excess soil from the bulbs. You can also brush the soil off with your hands.
- Cut off the leaves and roots:Cut off the leaves and roots about 1-2 inches above the bulb.
- Cure the garlic bulbs:After harvesting, cure the garlic bulbs for 2-3 weeks in a well-ventilated, dry place. Curing helps to dry out the bulbs and improve their storage life.
- Spread the bulbs out in a single layer in a cool, dry, and well-ventilated place.
- Avoid direct sunlight or heat, as this can damage the bulbs.
- The curing process allows the bulbs to dry and harden, which prevents them from sprouting or rotting.
- Store the garlic bulbs:Once the garlic bulbs are cured, you can store them in a cool, dry, and dark place. The ideal storage temperature is between 32-40°F (0-4°C).
- Store garlic bulbs in a well-ventilated container or basket.
- Avoid storing garlic near fruits or vegetables that emit ethylene gas, as this can accelerate spoilage.
- Properly stored garlic can last for several months.
Common Garlic Propagation Challenges and Solutions

Garlic propagation, while generally straightforward, can be met with certain challenges. Understanding these obstacles and implementing preventative measures can significantly increase your success rate in cultivating healthy garlic bulbs.
Disease Prevention and Management
Diseases can severely impact garlic growth and yield. Early identification and preventative measures are crucial.
- White Rot:This fungal disease, caused by Sclerotium cepivorum, is a serious threat. Symptoms include yellowing leaves, wilting, and a white, cottony growth on the bulbs.
- Prevention:Rotate crops, avoid planting garlic in areas with a history of white rot, and use disease-free planting material.
- Treatment:Unfortunately, there is no effective treatment for white rot once it has infected plants. Infected plants should be removed and destroyed to prevent further spread.
- Garlic Rust:This fungal disease, caused by Puccinia allii, is characterized by reddish-brown pustules on the leaves.
- Prevention:Choose resistant garlic varieties and ensure good air circulation around plants.
- Treatment:Fungicides can be used to control rust, but they should be applied before the disease becomes widespread.
- Downy Mildew:This fungal disease, caused by Peronospora destructor, causes yellowing and wilting of leaves.
- Prevention:Choose resistant varieties and avoid planting garlic in areas with poor drainage.
- Treatment:Fungicides can be used to control downy mildew, but they should be applied early in the season.
Pest Control
Pests can also significantly damage garlic plants.
- Garlic Root Nematodes:These microscopic roundworms can damage roots and stunt plant growth.
- Prevention:Use nematode-resistant garlic varieties and rotate crops.
- Treatment:There are no effective treatments for garlic root nematodes. If you suspect a nematode infestation, it’s best to avoid planting garlic in that area for several years.
- Onion Fly:The onion fly ( Delia antiqua) lays eggs on the soil near garlic plants, and the larvae feed on the roots and bulbs.
- Prevention:Cover the soil with a row cover or mulch to prevent flies from laying eggs.
- Treatment:If an infestation occurs, you can try to control it with insecticidal soap or a commercially available insecticide.
- Slugs and Snails:These pests can damage garlic leaves and bulbs.
- Prevention:Create a barrier around your garlic plants using diatomaceous earth or copper tape.
- Treatment:Hand-picking slugs and snails can be effective, and there are also several commercially available slug and snail baits.
Other Challenges
- Poor Soil Drainage:Garlic requires well-drained soil. If the soil is too wet, the bulbs can rot.
- Solution:Improve drainage by adding compost or other organic matter to the soil, or by creating raised beds.
- Insufficient Sunlight:Garlic needs at least six hours of direct sunlight per day.
- Solution:Choose a planting location that receives adequate sunlight.
- Improper Planting Depth:Planting garlic cloves too deep or too shallow can hinder growth.
- Solution:Plant cloves 2-3 inches deep, with the pointed end facing up.
Examples of Garlic Propagation Methods
Garlic propagation involves using cloves or bulbils to grow new garlic plants. There are several common methods used by gardeners and farmers. Each method has its own advantages and disadvantages, depending on the desired outcome and the specific growing conditions.
Propagating garlic is a rewarding experience, allowing you to grow your own flavorful bulbs year after year. Just like starting your own carnivorous plants, like the Venus Flytrap, from seed or cuttings, garlic propagation is a simple process that can be easily mastered.
If you’re looking for an even easier approach to propagating your own plants, check out Grow Your Own Venus Flytrap: An Easy Propagation Guide for a beginner-friendly guide. Once you’ve mastered garlic propagation, you’ll be well on your way to a thriving garlic garden that will provide you with delicious bulbs for years to come.
Methods for Garlic Propagation
The most common methods for garlic propagation are:
- Cloves:This is the most common method, and it involves planting individual cloves from a mature garlic bulb. This is the simplest and most reliable method for propagating garlic, as it ensures that the new plants will inherit the characteristics of the parent bulb.
- Bulbils:These are small, aerial bulbs that form on the flower stalks of hardneck garlic varieties. Bulbils can be planted to produce new garlic plants, but they may take several years to develop into mature bulbs. This method is often used for developing new garlic varieties or preserving genetic diversity.
- Sets:These are small, immature bulbs that are produced by garlic plants. Sets are typically smaller than cloves and are often used for planting garlic in areas where the growing season is shorter. This method is faster than using bulbils, but the resulting bulbs may be smaller than those produced from cloves.
Cloves Propagation
Planting cloves is the most straightforward and widely used method of propagating garlic. It involves separating the cloves from a mature bulb and planting them directly into the ground.
- Preparation:Select healthy, plump cloves from a mature garlic bulb. Each clove contains a tiny plant embryo that will develop into a new garlic plant. It is best to use cloves from the outer layers of the bulb as they tend to be larger and healthier.
- Planting:Plant the cloves with the pointed end facing upwards. The depth of planting should be about 2 inches (5 cm) deep and the spacing between cloves should be 6-8 inches (15-20 cm) apart. The cloves should be planted in well-drained soil that is rich in organic matter.
- Timing:The best time to plant garlic cloves is in the fall, about 6-8 weeks before the first frost. In warmer climates, garlic can be planted in the spring.
- Watering:Garlic requires consistent moisture, especially during the growing season. Water regularly, ensuring the soil is consistently moist but not waterlogged.
- Fertilization:Garlic benefits from a balanced fertilizer application during the growing season. Use a fertilizer that is high in nitrogen and phosphorus, as these nutrients are essential for leaf growth and bulb development.
Bulbils Propagation
Garlic bulbils are small, aerial bulbs that form on the flower stalks of hardneck garlic varieties. These bulbils can be used to propagate new garlic plants, but it is a slower process than planting cloves.
- Harvesting:Harvest the bulbils when they are fully mature, which is typically when the flower stalks have dried and turned brown. The bulbils will be small, about the size of a pea. They will be located at the top of the flower stalk, surrounded by a papery husk.
- Planting:Plant the bulbils in a well-prepared bed in the spring or fall. The bulbils should be planted about 1/2 inch deep and spaced about 2 inches apart. Bulbils will take several years to mature into full-sized garlic bulbs.
- Care:Bulbils need consistent moisture and good drainage. Water regularly and provide a balanced fertilizer throughout the growing season.
Sets Propagation
Garlic sets are small, immature bulbs that are produced by garlic plants. They are typically smaller than cloves and are often used for planting garlic in areas where the growing season is shorter. Sets can be purchased from garden centers or seed companies.
- Planting:Plant the sets in the spring or fall, depending on the climate. They should be planted about 1 inch deep and spaced about 4-6 inches apart. The sets will mature into full-sized garlic bulbs within a single growing season.
- Care:Sets need consistent moisture and good drainage. Water regularly and provide a balanced fertilizer throughout the growing season.
Final Wrap-Up
Propagating garlic is a rewarding experience that allows you to enjoy the fruits of your labor in the form of fresh, flavorful garlic bulbs. By following the steps Artikeld in this guide, you’ll be well on your way to cultivating a thriving garlic patch.
Remember to choose healthy garlic bulbs, prepare the cloves properly, and provide your plants with the right care. With a little patience and attention, you’ll soon be harvesting your own homegrown garlic, adding a touch of freshness and flavor to your culinary creations.
Happy gardening!
General Inquiries
What is the best time to plant garlic?
The best time to plant garlic varies depending on your location and climate. In general, it’s recommended to plant garlic in the fall, about 6-8 weeks before the first frost.
How long does it take for garlic to grow?
Garlic typically takes 7-9 months to mature, depending on the variety and climate.
Can I propagate garlic from seed?
While garlic can be propagated from seed, it’s a much more challenging process than propagating from cloves. Garlic seeds are known as “scapes” and are typically used to develop new varieties.
How do I store garlic after harvest?
After harvest, garlic should be cured in a dry, well-ventilated area for 2-3 weeks. Once cured, garlic can be stored in a cool, dry place for several months.
